*SHARE KO LANG
How to Make a Ghillie MaskFirst
thing you need to do is pick up your supplies that are going to be
needed here. Keep in mind you may substitute either of these materials
for something better. I just used what was readily available to me at
the time.
Materials
· Basic Paintball Mask
·
A good amount of burlap/Jute (which ever you have or prefer) I used
approximately 3 square feet +/- , can be found in a sheet in Wal-Mart
already camo dyed in Mossy Oak pattern
· Fishing Line (any lb test will do, I used 6lb)
· Plastic Fork (This is not to eat with
this time)
· Gorilla Glue or any other form of a polyurethane glue (can be found in Wal-Mart)
· Scissors
· Tiny Drill bit
.just big enough for the fishing line
· Camo Tape (if you choose to cover part of your lens)
· Fire Retardant Spray (check Menards or various places)
Step One)First
thing you want to do is take your lens housing out of the mask. Not all
the way off, just so you can tuck the burlap in the lens area after its
cut out. Take your sheet of burlap and cut a piece that is large enough
to wrap around from one side of the mask to the other around the front,
No need to cover the back side. Now once you have the needed size of
Burlap cut out you well need to cut out the area for your lens.
Step Two)Remember the plastic fork? Now is when you will need to get this ready,
you will basically need to break off one of the tongs (?) and drill a
small hole through the end without the point. Now you have your own
needle
perfect for those of us who cant use the tiny needles.
Step Three)Now you can choose to use the mock needle here or wait. I used it
because its easier to feed the fishing line through the burlap. Now
start with one side and fasten the burlap to the mask by tying the
fishing line through the vents or small hole on the side of the mask.
Now do the same on the other side. Now work your way around the mask
ever couple of inches from top to bottom and tie on the burlap with
your fishing line.
Step Four) You have the
sides secured now and can begin to cut out your lens. Now dont cut it
too short leave a good amount that you can over hang the edge where
your lens would go. Secure this area of the burlap now; this will help
you to secure the front part of burlap. Basically think of this as your
foundation.
Step Five) Now you have
everything set on your mask and secured. This is where it gets fun.
Take your gorilla glue/polyurethane glue. And start to place small dabs
of glue on every piece of fishing line you tied to your mask, both on
the front and back sides. Not a lot just enough to secure the lines
from coming untied and also to help support some of the material. While
this is drying you can start on the next step.
Step Six)OK now we can start to cut strips of burlap here. You will want to have
strips of about 6-8 in length and about 2 inches wide. Cut a bunch of
these because this is the next layer in which we will be covering the
mask with. So make sure you have plenty of them to make thin layer. If
you have extras you can use them in the next process.
Step Seven)Once you have all your strips cut that you believe you will need and
the glue has dried on your mask (Best to wait overnight). We can start
to attach the strips one by one to the mask. Simple sewing works great
here. Start on the bottom of the mask and work your way around and then
up about 2-3 staggering them after the first layer. Using the mock
needle here makes this a breeze. Once you have got your entire mask
layered then we will want to apply more glue to the fishing line spots
again. Allow it to dry over night once again. This is too keep you from
losing a lot of burlap and having to constantly replace it.
Step Eight)While you wait for the glue to dry you can start on the next part. We
are going to need lots and Lots of burlap string, basically take and
cut 3 ft wide sections, one thats about 8 long, and another thats
about 10 long. Start pulling it apart so you have strings of burlap.
You will need a bunch of this stuff because this is your final cover of
the mask.
Step Nine) OK Day two, yeah it
is taking forever. Now you have all your string of burlap what you want
to do now is start tying in all the strings into the strips you put on
the previous layer, once again working from the bottom up. This is
probably going to be the longest process. Make sure you try to mix up
the colors of strings. Now with each string place a small dab of the
glue on the knot. This will keep all your hard work from falling off so
easily. Let the glue all dry before moving on from each layer, not
needed to dry over night a simple 10 minutes will be fine, just so its
not gluing the strings together as you move up
Step Ten)Now You have got your Mask covered
YES finally done. NOT just yet.
Well if you didnt notice as you were applying the glue its not the
best color to leave
so this is where you will want to spray paint the
mask and cover the glue at least. Dont spray too much of your burlap,
just want to cover the glue spots.
Step Eleven)Now the paint is dry, time to give this baby a washing. Thats right
washing it. You are going to soak this under a flow off HOT water. This
will clean the burlap of any loose pieces and give it a good clean. Not
to mention it will spiral up as it is being dried. This is normal and
exactly what you want. You may even want to repeat the process a couple
times after its dried up to help fade the burlap.
Step Twelve)Now you have everything done this far. But what kind of guy would I be
to let you go out using a flammable piece of equipment? Not very good
if you ask me. OK so you will need to take your flame retardant spray
and cover every part of the burlap. You want to do this for added
safety. This will keep your mask from becoming a new candle.
Step Thirteen)Time to put it all together and try it on. See how it fits and see if
you need to trim stuff poking through on the inside. Also you may want
to make a head cover as well for your mask. Simple flap of burlap with
same processes applied.
Also for those who wish to cover a
part of their lens with the camo tape. You will want to take the lens
itself out of the housing. I went with a ¾ strip all the way across
the center of the mask. This helps cut down a good amount of the
surface area that would give off a glare. Simply just tape off the
excess from the top and the bottom.
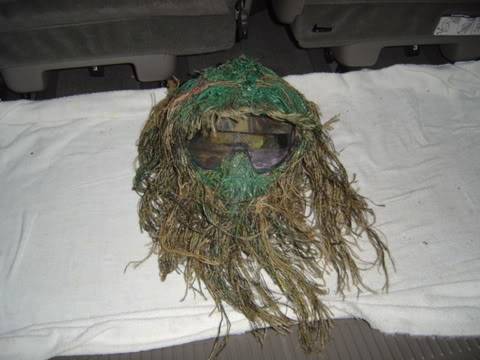
Finished Product should look like this....
source: spec ops forum